摘要 PyCUDA GPU 编程。主要内容是掌握几种PyCUDA 的基本内核函数,在 Python 中生成和调用并行化的 CUDA C 内核函数,以及了解 PyCUDA 的并行前缀算法。
获取 GPU 信息 首先,需要初始化 CUDA,使用 pycuda.driver.init()或通过import pycuda.autoinit使用autoinit子模块初始化,接下来使用pycuda.driver.Device(i)来访问不同的 GPU 设备,这里笔者的电脑为单 GPU
1
2
3
4
5
6
7
8
9
10
11
12
13
14
15
16
import pycudaimport pycuda.driver as drvdrv.init() gpu_device = drv.Device(0 ) print ('GPU Device Name{}: {}' .format (0 , gpu_device.name()))print ('SM Count: {}' .format (gpu_device.MULTIPROCESSOR_COUNT))print ('Shared Memory Size per Thread Block: {} KB' .format (gpu_device.MAX_SHARED_MEMORY_PER_BLOCK / 1024.0 ))print ('Threads per Thread Block: {}' .format (gpu_device.MAX_THREADS_PER_BLOCK))print ('Threads per SM: {}' .format (gpu_device.MAX_THREADS_PER_MULTIPROCESSOR))print ('Warps per SM: {}' .format (gpu_device.MAX_THREADS_PER_MULTIPROCESSOR / 32 ))
运行命令
输出如下,SM 数量为 30,每个线程块的共享内存为 48KB,每个线程块有 1024 个线程,每个 SM 有 1536 个线程,每个 SM 有 48 个线程束
1
2
3
4
5
6
GPU Device Name0: NVIDIA GeForce RTX 3060 Laptop GPU SM Count: 30 Shared Memory Size per Thread Block: 48.0 KB Threads per Thread Block: 1024 Threads per SM: 1536 Warps per SM: 48.0
使用 gpuarray 类 PyCUDA 库中,gpuarray 为数据的存储类型,正如 Numpy 库中的 array 为数据的存储类型
传输数据 在 CUDA C 中,我们需要使用 cudaMemcpyHostToDevice和cudaMemcpyDeviceToHost等函数来进行主机与设备的数据传输,需要跟踪主机与设备内存空间中的多个指针,还要进行内存分配,会使代码变得复杂,PyCUDA 的 gpuarray 能够自动完成内存分配,并根据生命周期自动释放。举例如下
1
2
3
4
5
6
7
8
9
10
11
12
13
14
15
16
17
18
19
20
import pycuda.autoinitfrom pycuda import gpuarrayimport numpy as npx_host = np.array([1 , 2 , 3 ], dtype=np.float32) y_host = np.array([4 , 5 , 6 ], dtype=np.float32) z_host = np.array([7 , 8 , 9 ], dtype=np.float32) x_device = gpuarray.to_gpu(x_host) y_device = gpuarray.to_gpu(y_host) z_device = gpuarray.to_gpu(z_host) print ((x_device + y_device + z_device).get())print ((x_device ** y_device).get())print ((x_device / z_device).get())[12. 15. 18. ] [ 1. 32. 729.00006 ] [0.14285715 0.25 0.33333334 ]
上面的程序使用gpuarray.to_gpu()将 array 转为 gpuarray,使用 gpuarray 的get()属性将 gpuarray 转为 array,除此之外,gpuarray 还具有如下属性
1
2
3
4
5
6
7
8
9
10
11
12
pycuda.gpuarray.zeros(shape, dtype=np.float64, *, allocator=None , order='C' ) pycuda.gpuarray.empty(shape, dtype, *, allocator=None , order='C' ) pycuda.gpuarray.zeros_like(other_ary, dtype=None , order='K' ) pycuda.gpuarray.empty_like(other_ary, dtype=None , order='K' ) pycuda.gpuarray.arange(start, stop, step, dtype=None , stream=None ) pycuda.gpuarray.take(a, indices, stream=None ) pycuda.gpuarray.maximum(a, b, out=None , stream=None ) pycuda.gpuarray.minimum(a, b, out=None , stream=None ) pycuda.gpuarray.max (a, stream=None ) pycuda.gpuarray.min (a, stream=None ) pycuda.gpuarray.sum (a, dtype=None , stream=None ) pycuda.gpuarray.dot(a, b, dtype=None , stream=None )
上述函数中的stream=None意为指定 CUDA 流,我们会在后面的章节详细讲解。
更多属性使用方法请查看官方文档
PyCUDA 生成并行化 Kernel 函数 PyCUDA 提供了大量函数来生成内联的 CUDA C 内核函数,内联函数通过 NVIDIA NVCC 编译器在外部编译缓存,由 PyCUDA 程序在运行时调用,下面为大家举几个主要例子,更详细的 PyCUDA 内核函数介绍请看官方文档
ElementwiseKernel 逐元素运算 ElementwiseKernel函数用于对 gpuarray 数组并行化逐元素计算,函数声明如下
class pycuda.elementwise.ElementwiseKernel(arguments, operation, name='kernel', keep=False, options=[], preamble='')
arguments: 意为参数列表,内容是声明变量的字符串,为 C/C++ 语法,末尾无分号operation: 为变量赋值,对数组的操作需要用 i 进行索引,类会自动 并行化 GPU 各核心中与 i 有关的计算,为 C/C++ 语法,末尾无分号name: 指定内核函数名称,命名空间在 CUDA C 中options: 构建时要使用的编译器选项,为list类型keep: 为True则保留编译器输出目录,并打印一行指示其所在目录以用于调试,False则不保留preamble: 指定内核构造之前包含的代码,可以使用它来包含其他文件和定义operation使用的函数下例的程序定义了一个名为 gpu_x2_kernel的内核函数,实现了输入数组in中每个元素的平方,将结果数组out中
1
2
3
4
5
6
7
8
9
10
11
import numpy as npimport pycuda.autoinitfrom pycuda import gpuarrayfrom time import timefrom pycuda.elementwise import ElementwiseKernelhost_data = np.float32(np.random.random(1 <<20 )) gpu_x2_kernel = ElementwiseKernel( "float *in, float *out" , "out[i] = in[i] * in[i]" , "gpu_x2_kernel" )
下面的程序比较了 gpuarray 数组运算与ElementwiseKernel类运算的速度,
1
2
3
4
5
6
7
8
9
10
11
12
13
14
15
16
17
18
19
20
21
22
23
24
25
26
27
28
29
30
31
32
33
34
35
36
37
38
39
40
41
42
43
44
45
46
47
import numpy as npimport pycuda.autoinitfrom pycuda import gpuarrayfrom time import timefrom pycuda.elementwise import ElementwiseKernelhost_data = np.float32(np.random.random(1 <<29 )) gpu_x2_kernel = ElementwiseKernel( "float *in, float *out" , "out[i] = in[i] * in[i]" , "gpu_x2_kernel" ) def speedcomparison (): t1 = time() host_data_x2 = host_data * host_data t2 = time() print ("total time to compute on CPU: {}" .format (t2 - t1)) device_data = gpuarray.to_gpu(host_data) device_data_2x = gpuarray.empty_like(device_data) t1 = time() gpu_x2_kernel(device_data, device_data_2x) t2 = time() from_device = device_data_2x.get() print ("total time to compute on GPU: {}" .format (t2 - t1)) print ("Is the host computation the same as the GPU computation? : {}" .format (np.allclose(from_device, host_data_x2))) if __name__ == '__main__' : speedcomparison() In [1 ]: run speedcomparison.py total time to compute on CPU: 0.36846113204956055 total time to compute on GPU: 0.07349300384521484 Is the host computation the same as the GPU computation? : True In [2 ]: run speedcomparison.py total time to compute on CPU: 0.368114709854126 total time to compute on GPU: 0.03887605667114258 Is the host computation the same as the GPU computation? : True In [3 ]: run speedcomparison.py total time to compute on CPU: 0.3670005798339844 dair_v2x_root total time to compute on GPU: 0.039081573486328125 Is the host computation the same as the GPU computation? : True
可以看到在首次运行 GPU 的内核函数后,运算时间会大幅减少,这正是因为 NVCC 编译器会编译好的内核函数缓存起来,以重复使用
其中在内核函数中定义的float *out为 C 语言的浮点型指针,所以会使用gpuarray.empty_like先在 GPU 开辟内存空间,将运算结果放入其中,再使用get函数拷贝回主机
InclusiveScanKernel 扫描内核函数 InclusiveScanKernel函数通过指定输入类型dtype和string类型的算术表达式scan_expr进行内核函数构造,再对数组逐元素进行并行化运算,函数声明如下
class pycuda.scan.InclusiveScanKernel(dtype, scan_expr, neutral=None, name_prefix='scan', options=[], preamble='', devices=None)
dtype: 指定输入数组类型scan_expr: 任意符合结合律的二元运算表达式,必须是 C 语言编写neutral: 中性元,加法应为 0,乘法应为 1,本小节后面会详细讲解原因name_prefix: 用于内核名称以确保配置文件和日志中的可识别性options 与 preamble 含义同上下面的程序对向量逐元素作加法以及逐元素查找最大值
1
2
3
4
5
6
7
8
9
10
11
12
13
14
15
16
17
import numpy as npimport pycuda.autoinitfrom pycuda import gpuarrayfrom pycuda.scan import InclusiveScanKernelseq1 = np.array(list (range (10 )),dtype=np.int32) seq2 = np.array([1 ,100 ,-3 ,-1000 ,4 ,1000000 ,65 ,2454 ],dtype=np.int32) seq1_gpu = gpuarray.to_gpu(seq1) seq2_gpu = gpuarray.to_gpu(seq2) sum_gpu = InclusiveScanKernel(np.int32, "a + b" ) max_gpu = InclusiveScanKernel(np.int32, "a>b ? a : b" ) print (sum_gpu(seq1_gpu).get())print (max_gpu(seq2_gpu).get())[ 0 1 3 6 10 15 21 28 36 45 ] [ 1 100 100 100 100 1000000 1000000 1000000 ]
上例所示,sum_gpu为"a + b",包含a和b代指的二元运算的两个元素,类似 Python 中的 lambda a,b : a + b,max_gpu类似lambda a,b : max(a,b)
ReductionKernel 规约内核函数 ReductionKernel函数对arguments并行执行 map expr,然后对其结果执行 reduce expr,相当于InclusiveScanKernel函数后接着ElementwiseKernel函数,函数声明如下
class pycuda.reduction.ReductionKernel(dtype_out, neutral, reduce_expr, map_expr=None, arguments=None, name='reduce_kernel', keep=False, options=[], preamble='', allocator=None)
dtype_out: 指定返回数据类型neutral: 中性元,加法应为 0,乘法应为 1,本小节后面会详细讲解原因reduce_expr: 相当于InclusiveScanKernel函数的reduce_exprmap_expr: 相当于ElementwiseKernel函数的operation其余关键字同上 下面的程序计算了两个向量的点积
1
2
3
4
5
6
7
8
9
10
11
12
13
14
15
16
import numpy as npimport pycuda.autoinitfrom pycuda import gpuarrayfrom pycuda.reduction import ReductionKernelseq1 = np.array(range (10 ),dtype=np.float32) seq2 = np.array(range (10 ),dtype=np.float32) seq1_gpu = gpuarray.to_gpu(seq1) seq2_gpu = gpuarray.to_gpu(seq2) dot_prod = ReductionKernel(np.float32, neutral="0" , reduce_expr="a+b" , map_expr="x[i] * y[i]" ,arguments="float *x, float *y" ) print (np.dot(seq1,seq2))print (dot_prod(seq1_gpu, seq2_gpu).get())285.0 285.0
PyCUDA SourceModule 并行函数 SourceModule函数将原来的内联 CUDA C 代码编译成可以从 Python 启动的内核函数,与上述所有函数不同的是,SourceModule函数在source中直接编写 CUDA C 整体内核函数代码,函数声明如下
class pycuda.compiler.SourceModule(source, nvcc='nvcc', options=None, keep=False, no_extern_c=False, arch=None, code=None, cache_dir=None, include_dirs=[])
source: 内核函数代码,使用 CUDA C 编写nvcc: 编译器命令no_extern_c: 默认为 False,source会被包装在 extern “C” { … } 中以防止 C++ 名称重整,为True则不会被包装在 extern “C” { … } 中arch: 指定传递给 nvcc 命令上 -arch 选项的值code: 指定传递给 nvcc 命令上 -code 选项的值cache_dir: 指定用于编译器缓存的目录,默认为PYCUDA_CACHE_DIR所指目录,为False则禁用缓存,如果环境变量PYCUDA_DISABLE_CACHE被赋值,意为全局禁用缓存,cache_dir将被覆盖include_dirs: 将一个或多个外部类传递给source,类型为 string list其余关键字同上 需要使用get_function得到已编译好的内核函数的引用,才可使用内核函数,下例程序计算了矩阵乘法
1
2
3
4
5
6
7
8
9
10
11
12
13
14
15
16
17
18
19
20
21
22
23
24
25
26
27
28
29
30
31
32
33
34
35
36
37
38
39
40
41
42
43
44
45
46
47
48
49
50
51
52
53
54
55
56
57
58
import pycuda.driver as cudaimport pycuda.toolsimport pycuda.autoinitimport numpy as npimport numpy.linalg as lafrom pycuda import gpuarrayfrom pycuda.compiler import SourceModuleimport time mod = SourceModule(""" __global__ void matrixMultiply(float * A, float * B, float * C, int A_shape_0,int A_shape_1,int B_shape_1) { float cValue = 0; int Row = blockIdx.y * blockDim.y + threadIdx.y; int Col = blockIdx.x * blockDim.x + threadIdx.x; if ((Row < A_shape_0) && (Col < B_shape_1)) { for (int k = 0; k < A_shape_1; k++) { cValue += A[Row*A_shape_1 + k] * B[k*B_shape_1 + Col]; } C[Row*B_shape_1 + Col] = cValue; } } """ ) matrixMultiply = mod.get_function("matrixMultiply" ) n = 1000 A = np.random.randint(0 ,10 ,1000000 ).reshape(1000 ,1000 ).astype(np.float32) B = np.random.randint(0 ,10 ,1000000 ).reshape(1000 ,1000 ).astype(np.float32) BLOCK_SIZE = 32 A_gpu = gpuarray.to_gpu(A) B_gpu = gpuarray.to_gpu(B) C_gpu = gpuarray.empty_like(A_gpu) if n % BLOCK_SIZE != 0 : grid=(n // BLOCK_SIZE+1 , n // BLOCK_SIZE+1 ,1 ) else : grid=(n // BLOCK_SIZE, n // BLOCK_SIZE,1 ) print ("grid size: {}" .format (grid))start = time.time() matrixMultiply(A_gpu, B_gpu, C_gpu, np.int32(A.shape[0 ]),np.int32(A.shape[1 ]),np.int32(B.shape[1 ]), block=(BLOCK_SIZE,BLOCK_SIZE,1 ), grid=grid); print ("result:\n" , C_gpu.get())print ("time cost: %ss" %(time.time() - start))grid size: (32 , 32 , 1 ) result: [[19305. 18274. 18786. ... 19130. 19501. 18229. ] [19945. 19823. 20158. ... 19853. 20397. 19848. ] [20651. 19959. 20910. ... 20715. 21033. 20364. ] ... [20196. 19777. 20198. ... 20291. 20736. 19916. ] [20239. 19820. 20210. ... 20171. 20685. 19244. ] [19595. 19444. 19546. ... 19862. 20462. 19508. ]] time cost: 0.003673076629638672 s
并行前缀算法 前面提到的InclusiveScanKernel函数和函数就是并行扫描算法之一,并行扫描算法定义如下
定义二元运算符 $\oplus$ 和一个有 $n$ 个元素的数组 $[x0, x_1, x_2, \cdots, x {n-1}]$
返回
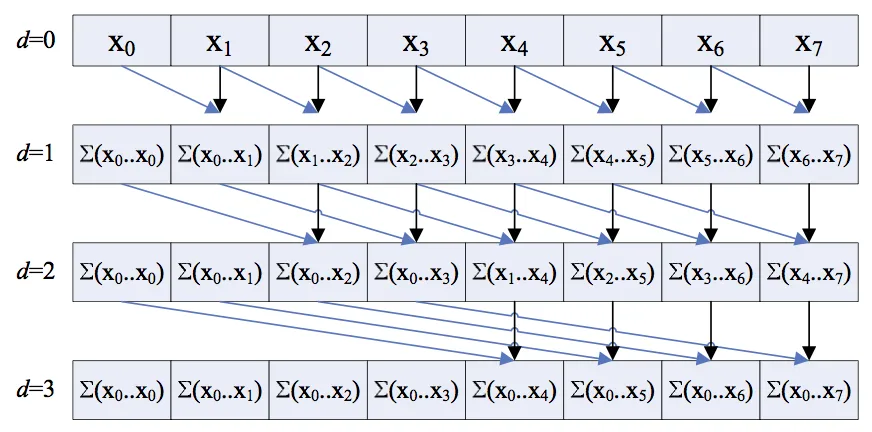
以加法举例,输入为 [0, 1, 2, 3, 4, 5, 6, 7, 8, 9],返回为[ 0 1 3 6 10 15 21 28 36 45],如果用串行的计算方式,需要计算 $n$ 次求和,时间复杂度为$O(n)$,我们要尽量降低时间复杂度
朴素并行前缀算法 朴素并行扫描算法是并行扫描算法的初始版本,我们假设输入元素为 n 个,且 n 为 2 的次幂,同时在 n 个线程上并行计算,时间复杂度为 $O(\log_{2} n)$,下图为算法示意图(原图链接 )
下面的程序以加法为例,计算了长度为 1024 的数组
1
2
3
4
5
6
7
8
9
10
11
12
13
14
15
16
17
18
19
20
21
22
23
24
25
26
27
28
29
30
31
32
33
34
35
36
37
38
39
40
41
import pycuda.autoinitimport pycuda.driver as drvimport numpy as npfrom pycuda import gpuarrayfrom pycuda.compiler import SourceModulefrom time import timenaive_ker = SourceModule(""" __global__ void naive_scan(double *vec, double *out) { __shared__ double sum_buf[1024]; int tid = threadIdx.x; sum_buf[tid] = vec[tid]; // begin parallel prefix sum algorithm int iter = 1; for (int i=0; i < 10; i++) { __syncthreads(); if (tid >= iter ) { sum_buf[tid] = sum_buf[tid] + sum_buf[tid - iter]; } iter *= 2; } __syncthreads(); out[tid] = sum_buf[tid]; __syncthreads(); } """ )naive_gpu = naive_ker.get_function("naive_scan" ) testvec = np.random.randn(1024 ).astype(np.float64) testvec_gpu = gpuarray.to_gpu(testvec) outvec_gpu = gpuarray.empty_like(testvec_gpu) naive_gpu( testvec_gpu , outvec_gpu, block=(1024 ,1 ,1 ), grid=(1 ,1 ,1 )) total_sum = sum ( testvec) total_sum_gpu = outvec_gpu[-1 ].get() print ("Does our kernel work correctly? : {}" .format (np.allclose(total_sum_gpu , total_sum)))
其中使用了__syncthreads()函数,保证了线程块中的所有线程在进入下一次迭代前,当前迭代里每一个线程的所有部分都被保存在了全局内存中
高效并行前缀算法 上一例的算法只能计算长度为 1024 的数组进行计算,且需要与长度等量的线程数量,接下来我们实现支持长度超过 1024 的任意数组的算法,此算法需要两个内核函数和 python 函数,分加进行上行扫描和下行扫描。上行扫描阶段类似于一次规约操作,即$x0 \oplus \cdots \oplus x {n-1}$,下行扫描阶段将对上行扫描的返回值进行计算,返回最终结果,具体代码如下
1
2
3
4
5
6
7
8
9
10
11
12
13
14
15
16
17
18
19
20
21
22
23
24
25
26
27
28
29
30
31
32
33
34
35
36
37
38
39
40
41
42
43
44
45
46
47
48
49
50
51
52
53
54
55
56
57
58
59
60
61
62
63
64
65
66
67
68
69
70
71
72
73
74
75
76
77
78
79
80
81
82
83
84
85
86
87
88
89
90
91
92
93
94
95
96
97
from __future__ import divisionimport pycuda.autoinitimport pycuda.driver as drvimport numpy as npfrom pycuda import gpuarrayfrom pycuda.compiler import SourceModulefrom time import timeup_ker = SourceModule(""" __global__ void up_ker(double *x, double *x_old, int k ) { int tid = blockIdx.x*blockDim.x + threadIdx.x; int _2k = 1 << k; int _2k1 = 1 << (k+1); int j = tid* _2k1; x[j + _2k1 - 1] = x_old[j + _2k -1 ] + x_old[j + _2k1 - 1]; } """ )up_gpu = up_ker.get_function("up_ker" ) def up_sweep (x ): x = np.float64(x) x_gpu = gpuarray.to_gpu(np.float64(x) ) x_old_gpu = x_gpu.copy() for k in range ( int (np.log2(x.size) ) ) : num_threads = int (np.ceil( x.size / 2 **(k+1 ))) grid_size = int (np.ceil(num_threads / 32 )) if grid_size > 1 : block_size = 32 else : block_size = num_threads up_gpu(x_gpu, x_old_gpu, np.int32(k) , block=(block_size,1 ,1 ), grid=(grid_size,1 ,1 )) x_old_gpu[:] = x_gpu[:] x_out = x_gpu.get() return (x_out) down_ker = SourceModule(""" __global__ void down_ker(double *y, double *y_old, int k) { int tid = blockIdx.x*blockDim.x + threadIdx.x; int _2k = 1 << k; int _2k1 = 1 << (k+1); int j = tid*_2k1; y[j + _2k - 1 ] = y_old[j + _2k1 - 1]; y[j + _2k1 - 1] = y_old[j + _2k1 - 1] + y_old[j + _2k - 1]; } """ )down_gpu = down_ker.get_function("down_ker" ) def down_sweep (y ): y = np.float64(y) y[-1 ] = 0 y_gpu = gpuarray.to_gpu(y) y_old_gpu = y_gpu.copy() for k in reversed (range (int (np.log2(y.size)))): num_threads = int (np.ceil( y.size / 2 **(k+1 ))) grid_size = int (np.ceil(num_threads / 32 )) if grid_size > 1 : block_size = 32 else : block_size = num_threads down_gpu(y_gpu, y_old_gpu, np.int32(k), block=(block_size,1 ,1 ), grid=(grid_size,1 ,1 )) y_old_gpu[:] = y_gpu[:] y_out = y_gpu.get() return (y_out) def efficient_prefix (x ): return (down_sweep(up_sweep(x))) testvec = np.random.randn(32 *1024 ).astype(np.float64) testvec_gpu = gpuarray.to_gpu(testvec) outvec_gpu = gpuarray.empty_like(testvec_gpu) prefix_sum = np.roll(np.cumsum(testvec), 1 ) prefix_sum[0 ] = 0 prefix_sum_gpu = efficient_prefix(testvec) print ("Does our work-efficient prefix work? {}" .format (np.allclose(prefix_sum_gpu, prefix_sum)))